Printing ProLaw Pre-bills to One PDF
Streamline Your Billing:
For legal professionals, efficiency is key. When it comes to billing, managing and distributing prebills can be a time-consuming task. Imagine the convenience of consolidating multiple prebills into a single, easily accessible PDF. Today, we’ll explore how to achieve this using the PDF-XChange ProLaw printer within your ProLaw system.
The Challenge: Managing Individual Prebill PDFs
Traditionally, printing prebills often results in numerous individual PDF files, one for each matter. This can lead to a cluttered file system and make it difficult to review and share information.
The Solution: Consolidating Prebills into a Single PDF
By leveraging the PDF-XChange ProLaw printer’s settings, you can seamlessly combine all your prebills into a single, comprehensive PDF document. This streamlines your workflow and simplifies the review process.
Important Note: Please be aware that the free version of PDF-XChange ProLaw will apply a watermark to your generated PDFs. This watermark cannot be removed without purchasing the full version of the software.
Step-by-Step Guide to Consolidating Prebills:
- Access Devices and Printers:
- Navigate to your Windows Start menu and select “Devices and Printers.”
- Printing Preferences:
- Right-click on the “PDF-XChange ProLaw Printer” and choose “Printing preferences.”
- Settings Tab:
- Click on the “Settings” tab and then select the “Save” menu.
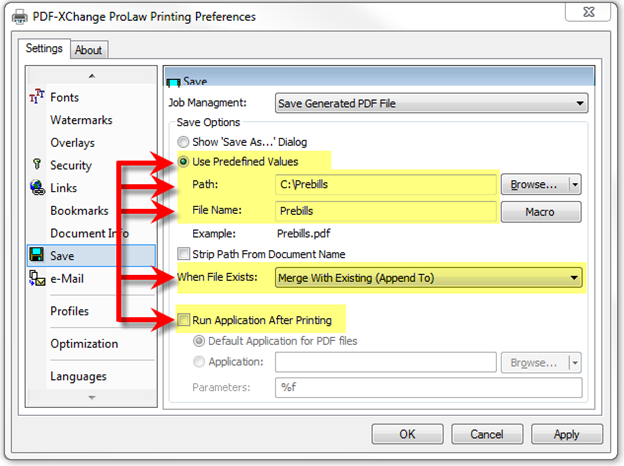
- Configure Save Settings:
- Choose “Use Predefined Values.”
- Under “Path,” specify the desired location to save your consolidated PDF.
- In the “File Name” field, enter “Prebills.”
- For “When File Exists,” select “Merge With Existing (Append To).”
- Uncheck “Run Application After Printing.”
- Click “OK.”
- Set Default Printer:
- Make the “PDF-XChange ProLaw Printer” your default printer.
- ProLaw Billing Tab:
- In ProLaw, open a matter, go to the “Billing” tab.
- Manage List:
- Select your Pre-bill format and click “Click here to manage the list”.
- Open Pre-bill Format:
- From the Statement Formats window, open your Pre-bill format.
- Default Printer:
- Ensure that “Default Printer” is selected for “Statement body” on the Pre-Bill Statement Formats tab.
- Return to Dashboard:
- Close all windows until you’re back at the ProLaw Dashboard.
- Run Prebills:
- Run your prebills as usual from transactions and click the “Print Statements” button. (Refer to the Appendix for detailed instructions on printing prebills/statements).
- Locate Consolidated PDF:
- Once printing is complete, navigate to the save location you specified in step 4. You’ll find your consolidated “Prebills.PDF” file, containing all the prebills from the matters in your grid.
- Batch Handling:
- If you’re running prebills in batches, remember to rename the “Prebills.PDF” file before starting the next batch to avoid overwriting it.
Important Considerations:
- The logo at the top of the pages cannot be removed at this time.
- The free version will have a watermark.
Benefits of Consolidating Prebills:
- Improved Organization: A single PDF file simplifies file management.
- Enhanced Review Process: Easily review all prebills in one document.
- Simplified Sharing: Share the consolidated PDF with clients or colleagues.
- Increased Efficiency: Streamline your billing workflow and save valuable time.
By following these steps, you can significantly enhance your billing process and improve overall efficiency within your legal practice.
ProLaw Back Office Tips
#ProLaw #ProLawBackOffice #ProLawPrebills #LegalBilling #Efficiency #Productivity #LawFirmManagement #PDF #Workflow #LegalProfession #LegalTech